


View of Allied centre grand field work, occupied by Hannoverian artillerie. This old skratch built model of mine had been reanimated to be used in game for the very first time since using Volley & Bayonet rules. Some troops you see here are only recently purchased flats of my gaming opponent M***. His cannon seen here is really a flat model. Behind are the Hannoverian Gardes (white flag) and another of M***'s regiments, that I would now identify as the 27th Inniskilling's, really. That day, they were labeled as Hannoverians by mistake. In the lower left foreground you see his command stand representing mylord ‘Leonidas’ Waldgrave. This man decided the day. His division alone knocked out about half the French army.

 View
on the centre of My doomed French. Below see a sketch of my terrain
set-up as well as the Ordre de Bataille of the two opposing armies for
this scenario.
View
on the centre of My doomed French. Below see a sketch of my terrain
set-up as well as the Ordre de Bataille of the two opposing armies for
this scenario.

 The card icons seen on my army roster sheets were needed for an alternative method of turn sequence, that I borrowed from another rule set. Testwise, we dropped the alternate turn sequence of V&B but instead adopted a card driven sequence. Each division was allocated a game card, Hearts for the French and Spades for the Allies. The sequence of turns became entirely random in the event. It was real good fun, but will need more fine-tuning. I guess we had too many cards in the game. Any concerted action by neighbouring divisions became entirely impossible. It created a lot of Fog Of War.


My scenario concentrated on a hypothetical clash of the two Armies principal forces supported by its immediate neighbouring forces on either flank. The situation is illustrated with the below sketch.

Historically, Broglie engaged Ferdinand’s Army at Sachsenhausen in a feint attack that day, in order to tie as many of Ferdinand’s force, while the real attack operations were directed simultaneously to Ferdinand’s flanks at Volkmarsen in the north and the Eder River between Waldeck and Fritzlar to the south. I thought, the French numerical superiority was fine enough to alter Broglie’s rather elegant plan and make him take the bull by the horns instead. Sure this was to become a bloody affair. Broglie's plan wasn't so bad – certainly much wiser then my somewhat dashy all out attack. Yeah guys… all my fault, I must confess. The official French campaign journal made the following assessment of the situation: On passait le temps aux camps de Corbach & de Saxenhausen, à s'observer réciproquement, les Ennemies avait retranché le leur, & ils ne paraît pas le devoir quitter de sitôt. D'ailleurs on n'aurait pas pu les en faire sortir de vive force sans se résoudre à perdre infiniment de monde.
While I was arranging My Scenario’s Armies and terrain set-up, I also took the effort to research the whereabouts of all other troops. 24 July was really a very busy day for the entire French army. Everybody was on the move. It was the result of some excellent staff work, I should say. I’m not aware the Austrians ever managed to launch anything at this scale without half the army being delayed or getting lost (the somewhat screwed Hochkirch and Liegnitz operations pop up in my mind here). The gentlemen from the Department of Military History of the German Great Generalstaff entitled such sort of operations as ‘Rococo Warfare In Perfection’ – but in a rather disparaging way (see vol. 12 pp. 270 ff.). They rejected the sort of operations where the light troops did all the work, while the bulk of the line remanied behind watching their progress as mere spectators with arms grounded. But, Broglie archieved his objective. A win. It was bloodshed enough. Several hundred got killed that day and a rather pressing pursuit during the next two days caused a many more casualties. Namely the comte de Broglies clash with Spörcken's Arriergarde around Viesebeck July 25 (about half way between Volkmarsen and Wolfhagen) were the roughnecks of de Vair's Volontaires got badly mauled by the mounted elements of the Legion Britannique and the sabers of the Black Carabiniers under major Monckewitz. About 800 men killed only here in a mater of a few hours on both sides.
I decided to have a very close look at the operation in its entirety. It provides the material for even more good games.
Disposition of Ferdinand’s Allied Army
A- Prince Ferdinands' Main Force
left with 48 bats, 51 esc, artillerie
B- Corps Kielmansegg
14 bats & 6 esc, artillerie (based on 25 July figures): 9 position guns
C- Corps Wangenheim
5 bats & 4 esc, artillerie
D- Corps Oheim
(under overall command of Wangenheim)
8 bats & 6 esc, artillerie
E- Corps Spörcken
14 bats & 18 esc, approx. 20 position guns, Légion Britannique (5 bats, 5 esc.), Hessian hussars, & Buckebourg Carabiniers noirs
F- Corps Howard & Gilsa
(under overall command of the Erbprinz)
8 bats & 6 esc, artillerie
G- Corps prince d'Anhalt
(under overall command of the Erbprinz)
6 bats & 4 esc, artillerie
H- Bronsvic Grenadier brigade
(under overall command of the Erbprinz)
3 bats
J- Corps Luckner
(under overall command of the Erbprinz)
The bulk of the Allies light troops
Below find the detailed breakdown for the entire Allied Army July 24 with an original record provided the Paris Archive at the Château Vincennes. The manuscript is easy enough to read, so I did not bother to do a transcription. Note the dispositions recorded here should be the situation in the afternoon 24 July. The Corps Kielmannsegg is now found encamped much closer to Ferdinands Main Force.
Also Wangenheim and Oheim are now both found encamped at Freienhagen behind Ferdinands right wing. By dawn 24 July, Kielmannsegg was located at Ober- and Nieder-Waroldern, Oheim with all the Hessian troops was in Landau, and Wangenheim with the Hannoverians was in Volkardingshausen to Kielmannseggs close support. The sheet showing the line-up of Ferdinands Sachsenhausen camp is incomplete. The generals are missing. Possibly, the author's desk got smashed by a French cannon ball leaving the poor man so shell shocked that he could not complete his work.


 | |
| Copyright restricted image – It is published here for purely academic use without any commercial intention. Source: Service Historice de l'Armée de Terre, Château de Vincennes, Paris |
Disposition of Broglie’s French Army
A- Broglies' Main Force
left with 49 bats, 73 esc, artillerie
B- Corps St. Pern
brigade Grenadiers de France, plus one unknown inf. brigade (La Marck? or possibly Alsace from Du Muy's Corps), & several mixed detachments of the army.
Also encamped here around Bernsdorf and Mühlhausen but not part of Saint Pern’s force for the 24 July attack operation was la brigade des Gardes and the Grenadiers Royaux. Possibly also the cavalry brigade Royal of the Army’s left wing cavalry.
C- Corps Lusace
approx. 18 bats & 26 esc, artillerie
D- Corps Stainville
principal forces: 2 regts of dragoons (du Roy & Feronnaye), Bercheny hussars, Légion Royale
E- Corps Du Muy (formally St. Germain)
approx. 34 bats, 24 esc, artillerie
F- Corps baron de Clauzen
Inf brigade Royal-Suédois & several mixed detachments of the army, artillerie
G- Corps comte de Broglie (the Maréchal's brother)
Inf. brigades Belzunce & Swiss Castellas, cav. brigade Orléans, 2 regts of dragoons (Beuffremont & Apchon), Volontaires de Flande, & Volontaires de Vair, artillerie
H- Corps Chabot
2 regts of dragoons (Royal & Thianges), Turpin hussars incl. attached Chasseurs, Fischer Corps, Volontaires de Dauphiné & d'Austrasie, also some artillerie from Du Muy's Corps (?)
J- Corps Wurmser
Royal Nassau hussars & mixed detachement of infantry
K- Corps Caraman
2 regts of dragoons (Caraman & Orléans)
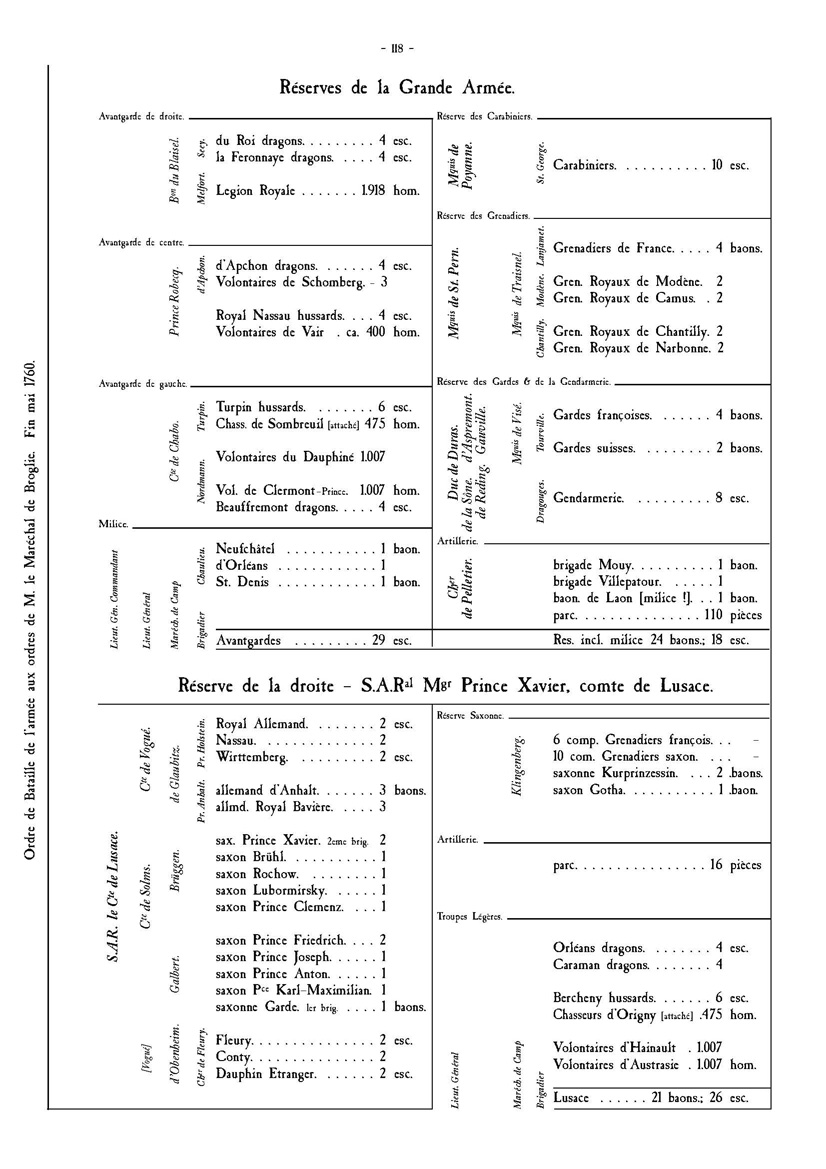
The basis for the composition of all troops remains the general Ordre de Bataille of June 1760. I have included the sheets once more further below. A number of troops had been employed guarding the French communications to Frankenberg and Margurg in the rear, or as garrison of these places. It included the regt. Boullion, the remains of the brigade d'Anhalt that had been shattered at Emsdorf, and possibly some others more. All were under the command of Stainville, but did not take part in the 24 July attack operation, to my understanding. Furthermore, the Volontaires de Clermont as well as a detachment of the Bercheny hussars along with this regiments associated Chasseurs d'Origny were operating along the Diemel River and probing into the direction of Paderborn in Westphalia at that time.
A- Broglies' Main Force
left with 49 bats, 73 esc, artillerie
B- Corps St. Pern
brigade Grenadiers de France, plus one unknown inf. brigade (La Marck? or possibly Alsace from Du Muy's Corps), & several mixed detachments of the army.
Also encamped here around Bernsdorf and Mühlhausen but not part of Saint Pern’s force for the 24 July attack operation was la brigade des Gardes and the Grenadiers Royaux. Possibly also the cavalry brigade Royal of the Army’s left wing cavalry.
C- Corps Lusace
approx. 18 bats & 26 esc, artillerie
D- Corps Stainville
principal forces: 2 regts of dragoons (du Roy & Feronnaye), Bercheny hussars, Légion Royale
E- Corps Du Muy (formally St. Germain)
approx. 34 bats, 24 esc, artillerie
F- Corps baron de Clauzen
Inf brigade Royal-Suédois & several mixed detachments of the army, artillerie
G- Corps comte de Broglie (the Maréchal's brother)
Inf. brigades Belzunce & Swiss Castellas, cav. brigade Orléans, 2 regts of dragoons (Beuffremont & Apchon), Volontaires de Flande, & Volontaires de Vair, artillerie
H- Corps Chabot
2 regts of dragoons (Royal & Thianges), Turpin hussars incl. attached Chasseurs, Fischer Corps, Volontaires de Dauphiné & d'Austrasie, also some artillerie from Du Muy's Corps (?)
J- Corps Wurmser
Royal Nassau hussars & mixed detachement of infantry
K- Corps Caraman
2 regts of dragoons (Caraman & Orléans)
The basis for the composition of all troops remains the general Ordre de Bataille of June 1760. I have included the sheets once more further below. A number of troops had been employed guarding the French communications to Frankenberg and Margurg in the rear, or as garrison of these places. It included the regt. Boullion, the remains of the brigade d'Anhalt that had been shattered at Emsdorf, and possibly some others more. All were under the command of Stainville, but did not take part in the 24 July attack operation, to my understanding. Furthermore, the Volontaires de Clermont as well as a detachment of the Bercheny hussars along with this regiments associated Chasseurs d'Origny were operating along the Diemel River and probing into the direction of Paderborn in Westphalia at that time.
Note: Interesting is the French use of its dragoons here. You see them exclusively employed as light troops. None served with the cavalry wings of the Army. Really, they do the same service as the hussars did with the Austrians or Prussians.


A very interesting report, and very good pics of the battle and units fighting. OB's and map should be of use to anyone willing to fight an "instant" battle. BTW which version of V&B are you using ?
ReplyDeleteWith the first version, I have personally used home made cards which were a mix of brigade cards , for each brigade(could be used to record losses for a mini campaign), of blank/dummy cards, artillery fire cards, "joker" cards (saying that a commander would be very good that day, or just the reverse). We could never solve the too much fog of war you describe, but it is a fun method for a game. OK I know, wargaming is a mock of reality,... anyway...it's not a reason to stop playing !
Thanks again for all the work you share.
Thanks you like it. We play the 2nd edition of V&B – but not all the way. We retained some elements of the 1st edition, such as different short ranges for Lt/Med/Hv artillery and possibly also some home grown variants.
ReplyDeleteFor instance, with my French vs Allies armies, all line cavalry is heavy, regardless if its cuirassiers, horse, or dragoons, while all skirmishing cav is light. I just delieted medium cav. All my French dragoons are exclusivly employed as skirmishing cav with the option to dismount and fight on foot – not so different from ACW cav. Minor issues of this sort, if you know what I mean.
Cheers,
Christian
Christian. I love your work the style you put on the figurines. The game look great and fun to play. I enjoy your blog. Can I ask one thing who make those figurines. I can't keep my eyes off of them. I love the looks of them. Thanks.
DeleteNader. Nader26@hotmail.com.
Dear Nader,
DeleteThank you for your compliments. My figurines come from about 10 or so different foundries. I often mix. If you have a special interest, please let me know what particular regiment in what image is of special interest (identify uniform colours and flag design for ex.). Then, I can say who makes them.
Cheers,
Christian
Christian
DeleteI do recognize a few figurines companies and the artillery(ies) (drums and fifer I think). I love semi-flat toy soldiers and tin soldiers. I hope you don't mind to send me the list of foundries. that is why I love how you set up by mixing with others figurines. It is amazing how you put it together. Thank you for your time. Nader
This is a wonderful account and beautifully presented game. Thanks for all the historical detail , I have bookmarked this for if/when I can do something similar. Sorry your French did not fair better.
ReplyDeleteChris
http://notjustoldschool.blogspot.co.uk/
Christian,
ReplyDeleteWhat a joy to find you have had another game. As ever I have really enjoyed reading the account of the battle and looking at your wonderful collection of figures. The western theatre is full of 'almost' battles and I hope to do a few myself when my collection is bigger.
Best regards,
Simon
Thanks Simon,
ReplyDeleteCarry on collecting. My gaming fellow M*** has started to do flats only a year or two ago, but can now already field armiey for smaller games. Some are his own paint job, while others are painted figures he got from e-bay. The latter took part in this game here.
Nice looking game (great historical details and explanations) and beautiful figures!
ReplyDeleteHow do I make money from playing games and earning
ReplyDeleteThese poormansguidetocasinogambling.com are the three most popular งานออนไลน์ forms of gambling, and are explained in a very concise and concise manner. https://vannienailor4166blog.blogspot.com/ The most common forms of https://febcasino.com/review/merit-casino/ gambling are: